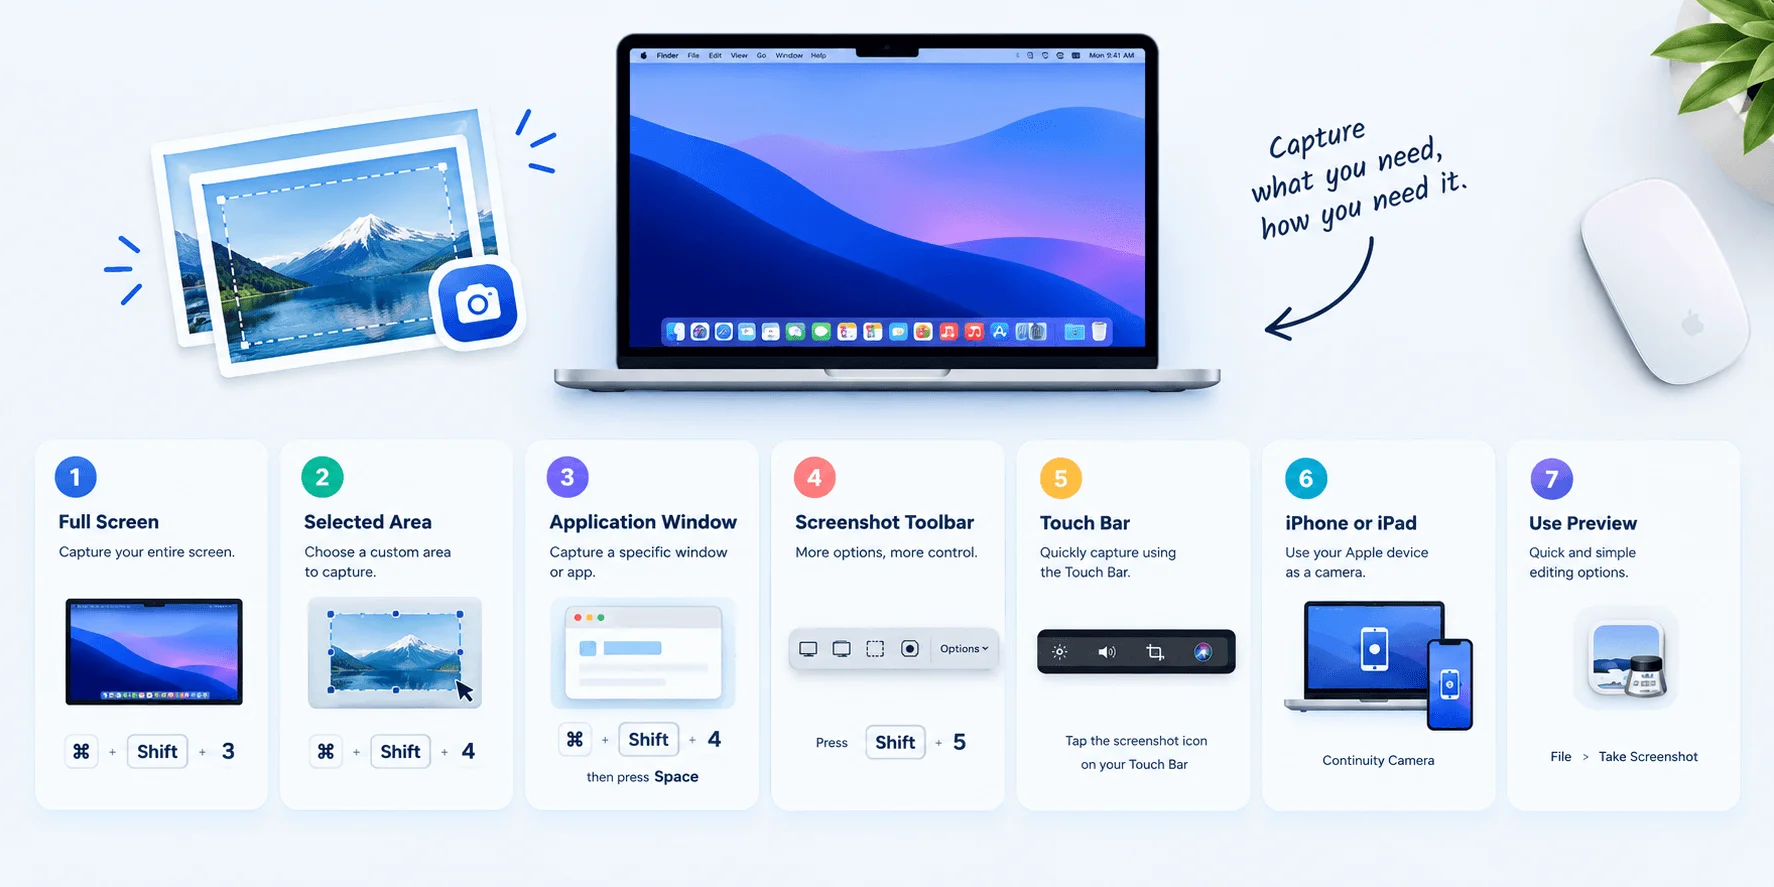
Quick answer: To screenshot on Mac, press Shift-Command-3 for the full screen, Shift-Command-4 to select an area, or Shift-Command-5 to open the Screenshot toolbar. Screenshots save to your desktop as PNG files by default. Add Control to any shortcut to copy the image to your clipboard instead.
Here's the deal.
Once you know how to screenshot on Mac, you can capture anything on your display in about two seconds.
I've seen people photograph their screens with a phone. Please don't do that.
In this guide, you'll learn seven built-in methods, where your files go, how to edit them, and what to do when nothing works.
Let's dive in.
Mac Screenshot Shortcuts at a Glance
You want the keys, so here they are. This table covers every Mac screenshot shortcut you're likely to need, straight from Apple's official screenshot guide and the Mac User Guide. Bookmark it, screenshot it (nicely meta), or print it. Below the table, I'll walk you through each method step by step.
Goal | Shortcut | Copy to clipboard instead |
|---|---|---|
Entire screen | Shift-Command-3 | Control-Shift-Command-3 |
Selected portion | Shift-Command-4, then drag | Control-Shift-Command-4 |
Window or menu bar | Shift-Command-4, then Space bar, then click | Add Control to the same keys |
Menu and menu items | Open menu, press Shift-Command-4, drag over items | Add Control to the same keys |
Screenshot toolbar | Shift-Command-5 | Choose Clipboard under Options |
Touch Bar | Shift-Command-6 | Add Control (not specifically documented) |
Simple, right?
Method 1: Capture the Entire Screen
Sometimes you need everything on your display, like a full dashboard or a whole desktop layout. This is the simplest full screen screenshot on a Mac, and it takes one motion. Apple confirms that a small thumbnail appears in the corner afterward, so you'll know it worked. Then the image saves to your desktop automatically.
Here's how:
Press and release Shift, Command, and 3 together.
Look for the thumbnail in the corner of your screen.
Click it to edit, or just wait for the file to save.
Easy.
Method 2: Capture a Selected Portion of the Screen
Most of the time, you don't want the whole screen. You want one chart, one error message, or one funny tweet. That's where partial screen capture shines. Your pointer turns into a crosshair, and you decide exactly what goes in the frame. It's more precise than cropping later, and honestly, it's the shortcut I use most.
Follow these steps:
Press Shift-Command-4.
Click and hold, then drag across the area you want.
Release the mouse or trackpad button to capture.
Press Esc if you change your mind.
Here's a neat trick.
While you're dragging, hold the Space bar and you can move your selection without resizing it, as Apple documents.
Method 3: Capture a Window
Want a clean shot of one app window without the messy background? Try this. Your pointer becomes a camera icon, and you click the window you want. macOS then adds a soft shadow around it, which looks great in tutorials and blog posts.
Do this:
Open the window you want to capture.
Press Shift-Command-4, then tap the Space bar.
Click the window.
Don't like the shadow? Hold the Option key while you click, and Apple says the shadow disappears.
Method 4: Capture a Menu and Menu Items
Menus can be tricky, because they often vanish the moment you press the wrong key. Luckily, macOS handles them well. You can grab the whole menu or just a few items, which is perfect for tutorials and bug reports. If you want the menu bar itself, use the window method above and click the bar instead.
Try this:
Open the menu you want to capture.
Press Shift-Command-4.
Drag the pointer over the menu items you want.
That's what Apple's Mac User Guide recommends. If the menu closes when you press the keys, set a 5- or 10-second timer in the Screenshot toolbar (covered in the next method), then open the menu before the countdown ends.
Method 5: Use the Screenshot App and Toolbar
Not a fan of memorizing key combos? Totally fair.
The built-in Screenshot app gives you a clickable Screenshot toolbar with everything in one place. It also unlocks options the basic shortcuts don't offer, like timers and custom save folders. Apple added it in macOS Mojave 10.14, so nearly every modern Mac has it.
Step-by-Step: Using the Screenshot Toolbar
According to Apple's Mac User Guide, the toolbar includes tools for capturing the entire screen, a window, or a portion of the screen.
Here's what to do:
Press Shift-Command-5, or search "Screenshot" in Spotlight.
Pick a capture tool from the toolbar.
Adjust the frame if you're capturing a portion.
Click Capture, or click the window you want.
Options Worth Changing
Now, let's talk about the Options menu. Per Apple, you can set a screenshot timer, choose where files save, show or hide the floating thumbnail, include the mouse pointer, and remember your last selection.
On supported Macs running macOS Tahoe 26 or later, you can also pick a capture format. Apple explains that SDR uses PNG for maximum compatibility, while HDR uses HEIF for richer brightness and color.
I stick with SDR. It just works everywhere.
Did you shoot in HDR and now need a JPG for a website or an older app? Our guide on how to convert HEIC to JPG on Mac, Windows, and iPhone walks you through it. HEIF images are often called HEIC files, so that's the guide you want.
Method 6: Take a Screenshot With Preview
Here's a lesser-known option. The Preview app can take screenshots too, and its main perk is that it lets you name the file before saving. It's slower than shortcuts, but it's handy when you're organizing a batch of images for a project. A Loom guide describes this workflow, though it's an older article, so menu labels may differ slightly on your version.
Try it:
Open Preview.
Choose File > Take Screenshot.
Pick From Selection, From Window, or From Entire Screen.
Name and save your file.
Method 7: Use Terminal to Take a Screenshot
Power users, this one's for you. The Terminal command screencapture lets you script captures, which is great for automation or when your keyboard acts up. The same Loom guide lists a few examples, so treat these as third-party tips and test them first.
screencapture test.jpgsaves a full-screen image to your current folder.screencapture -T 10 timedshot.jpgwaits 10 seconds first.screencapture -x quiet.jpgskips the shutter sound.
Handy, isn't it?
Where Do Mac Screenshots Go? Save, Copy, and Change Location
You took the screenshot. Now where on earth is it?
By default, Apple says screenshots save to your desktop, and the Mac User Guide adds that they're PNG files with names starting with "Screenshot" and including the date and time. Apple's two pages word the default name slightly differently ("Screen Shot" versus "Screenshot"), so don't panic if yours looks a bit different.
Copy a Screenshot to the Clipboard
Sometimes you don't want a file at all. You just want to paste the image into an email or chat. It takes one extra key: hold Control while pressing the other keys, as Apple explains.
Then press Command-V in your destination app.
You can also Control-click the floating thumbnail and choose Save to Clipboard.
Change the Default Save Location
A cluttered desktop drives me nuts. Luckily, you can send every future screenshot to a dedicated folder. This helps a lot if you share your screen on calls.
Follow these steps:
Press Shift-Command-5.
Click Options.
Under Save to, pick a preset or choose Other Location.
Select your folder and confirm.
Tom's Guide walks through the same process.
Switch the File Format With Terminal
Want JPG instead of PNG? The toolbar doesn't offer a simple picker for that, according to TechSmith. A ScreenSnap Pro tutorial suggests running defaults write com.apple.screencapture type jpg, then killall SystemUIServer.
This is a third-party tip, so try it on a spare folder first.
How to Edit, Mark Up, and Share Your Screenshots
A raw screenshot is rarely the finished product.
Usually, you'll want to circle something, crop it, or add an arrow. The good news is that macOS handles this natively, and you can start editing the second the screenshot appears. That saves real time when you're documenting steps or reporting a bug.
Use the Floating Thumbnail
That little preview in the corner is more useful than it looks. According to Apple's Mac User Guide, it stays visible for a few seconds so you can act on it.
You can:
Swipe right to save the file immediately.
Drag it into a document, email, note, or Finder window.
Click it to open Markup or share it.
Annotate With Markup Tools
Once the editor opens, you get a full toolbox. Apple's Markup guide lists Sketch, Shapes, Text, Sign, Crop, and Rotate, plus a Loupe for magnifying details.
Here's a quick workflow:
Click the thumbnail after capturing.
Choose a tool from the toolbar.
Add your arrows, boxes, or text.
Click Done.
Pro tip: hold Option while dragging a shape to duplicate it.
How to Record Your Screen on Mac
Screenshots are great, but sometimes a still image can't explain what's happening. That's when you record.
The same Shift-Command-5 toolbar handles video, so you already know where to go. Apple's screen recording guide covers the whole process.
Here's how:
Press Shift-Command-5.
Choose Record Entire Screen or Record Selected Portion.
Open Options to pick a microphone or set a timer.
Click Record.
Stop with the menu bar button or Command-Control-Esc.
Recordings save as .mov files, per Apple. You can also use QuickTime Player and press Control-Command-N.
How to Take a Scrolling Screenshot on Mac
Now for the awkward truth.
Your Mac can't natively capture a long, scrolling page in one image. TechSmith confirms that native shortcuts capture only visible content. That's frustrating when you're saving a long article or chat thread, but you have two workable options.
Export to PDF: An Apple Community answer suggests saving the page as a PDF from Safari or Chrome, then converting it to an image in Preview.
Use a dedicated app: Tools like Shottr advertise scrolling screenshots, OCR, and annotation.
Best Third-Party Screenshot Tools for Mac
Do you even need an extra app?
For most people, no. Still, if you need scrolling capture or heavier annotation, a dedicated tool can help. Here's a quick comparison based on what each vendor says about its own product, so weigh these claims accordingly.
Tool | Best for | Notable features (per vendor) |
|---|---|---|
Built-in macOS tools | Everyday captures | Shortcuts, toolbar, Markup, screen recording |
Shottr | Fast, lightweight capture | Scrolling screenshots, OCR, annotation, measurement tools |
Snagit (TechSmith) | Team documentation | Scrolling capture, redaction, annotation, capture library |
Mac Screenshot Not Working? Try These Fixes
Ever pressed the keys and got nothing?
Don't worry. Most of the time it's a simple setting, not a broken Mac. ScreenSnap Pro lists the usual causes: disabled shortcuts, a wrong save location, low storage, a frozen utility, or a conflicting app. Setapp's troubleshooting guide agrees.
Try these fixes in order:
Open System Settings > Keyboard > Keyboard Shortcuts > Screenshots and make sure the shortcuts are on, as Apple describes.
Press Shift-Command-5, click Options, and check your save location.
Free up disk space.
Open Activity Monitor, search "Screenshot," and quit it, per Setapp.
Restart your Mac.
Also remember that some apps, like Apple TV, may block screenshots entirely.
Deleted a Screenshot by Accident?
It happens to everyone.
Check the Trash first. If it's not there, our guide on how to recover deleted files covers Time Machine on Mac and recovery software for tougher cases. Act quickly and avoid saving new files to the same drive, because new data can overwrite what you're trying to recover.
Which macOS Version Has Which Screenshot Feature?
Features vary by version, and that trips people up.
I pulled the version details from Apple's screenshot page and recording page into one table. Check your version under Apple menu > About This Mac before following any step that mentions a newer feature.
Feature | Minimum macOS version |
|---|---|
Screenshot app and Shift-Command-5 toolbar | Mojave 10.14 |
HDR (HEIF) capture format on supported Macs | Tahoe 26 |
Record a selected window | Tahoe 26 |
Include system audio in recordings | macOS 27 Golden Gate |
Ask Siri about your screen (Siri AI Beta) | macOS 27 Golden Gate |
Heads Up: Command-Shift-6 May Have Two Jobs
In macOS 27 with Siri AI (Beta) on, Apple says you can press Command-Shift-Space bar for the active window or Command-Shift-6 for a portion of the screen. However, Command-Shift-6 is also listed as the Touch Bar screenshot shortcut in Apple's Mac User Guide. So the two may overlap, and it's worth checking your macOS version before you rely on either.
Frequently Asked Questions About Screenshots on Mac
Let's answer the questions people ask most. Each answer stays short, so you can scan and move on.
Where do screenshots go on Mac?
They save to your desktop by default, per Apple. You can change the folder in the Screenshot toolbar under Options > Save to.
How do I screenshot on Mac without a keyboard?
Open the Screenshot app from Spotlight or the Utilities folder inside Applications. Then click a capture tool and hit Capture, as Apple's guide explains.
How do I screenshot a single window?
Press Shift-Command-4, tap the Space bar, then click the window. Hold Option while clicking to remove the shadow.
How do I change the screenshot format?
On supported Macs with Tahoe 26 or later, choose SDR (PNG) or HDR (HEIF) under Options > Capture Format. For JPG, a third-party tutorial suggests a Terminal command, or you can convert HEIC files to JPG afterward.
Why is my Mac screenshot not working?
Usually it's a disabled shortcut, a changed save location, or a full disk. Check System Settings > Keyboard > Keyboard Shortcuts > Screenshots first.
How do I take a scrolling screenshot on Mac?
macOS can't do it natively. Save the page as a PDF and convert it in Preview, or try an app like Shottr.
How to Screenshot on Mac: Which Method Should You Use?
So, which one wins?
Honestly, it depends on what you're doing. Here's my cheat sheet:
Whole screen, fast: Shift-Command-3.
Just one area: Shift-Command-4.
Clean window shot: Shift-Command-4, then Space bar.
Timers, folders, or video: Shift-Command-5.
Paste straight into an email: add Control to any shortcut.
Here's a bonus use for your new skill. A screenshot works as a search input, too. If you want to find where a photo came from, take a screenshot and run it through a search, as our Google reverse image search guide explains. It's especially handy for social media photos, where a direct search often comes up empty.
For another take on the Mac basics, see TechRadar's guide.
Now it's your turn.
Open a window, press those keys, and try each method once. It takes two minutes, and I promise you'll never wonder how to screenshot on Mac again.