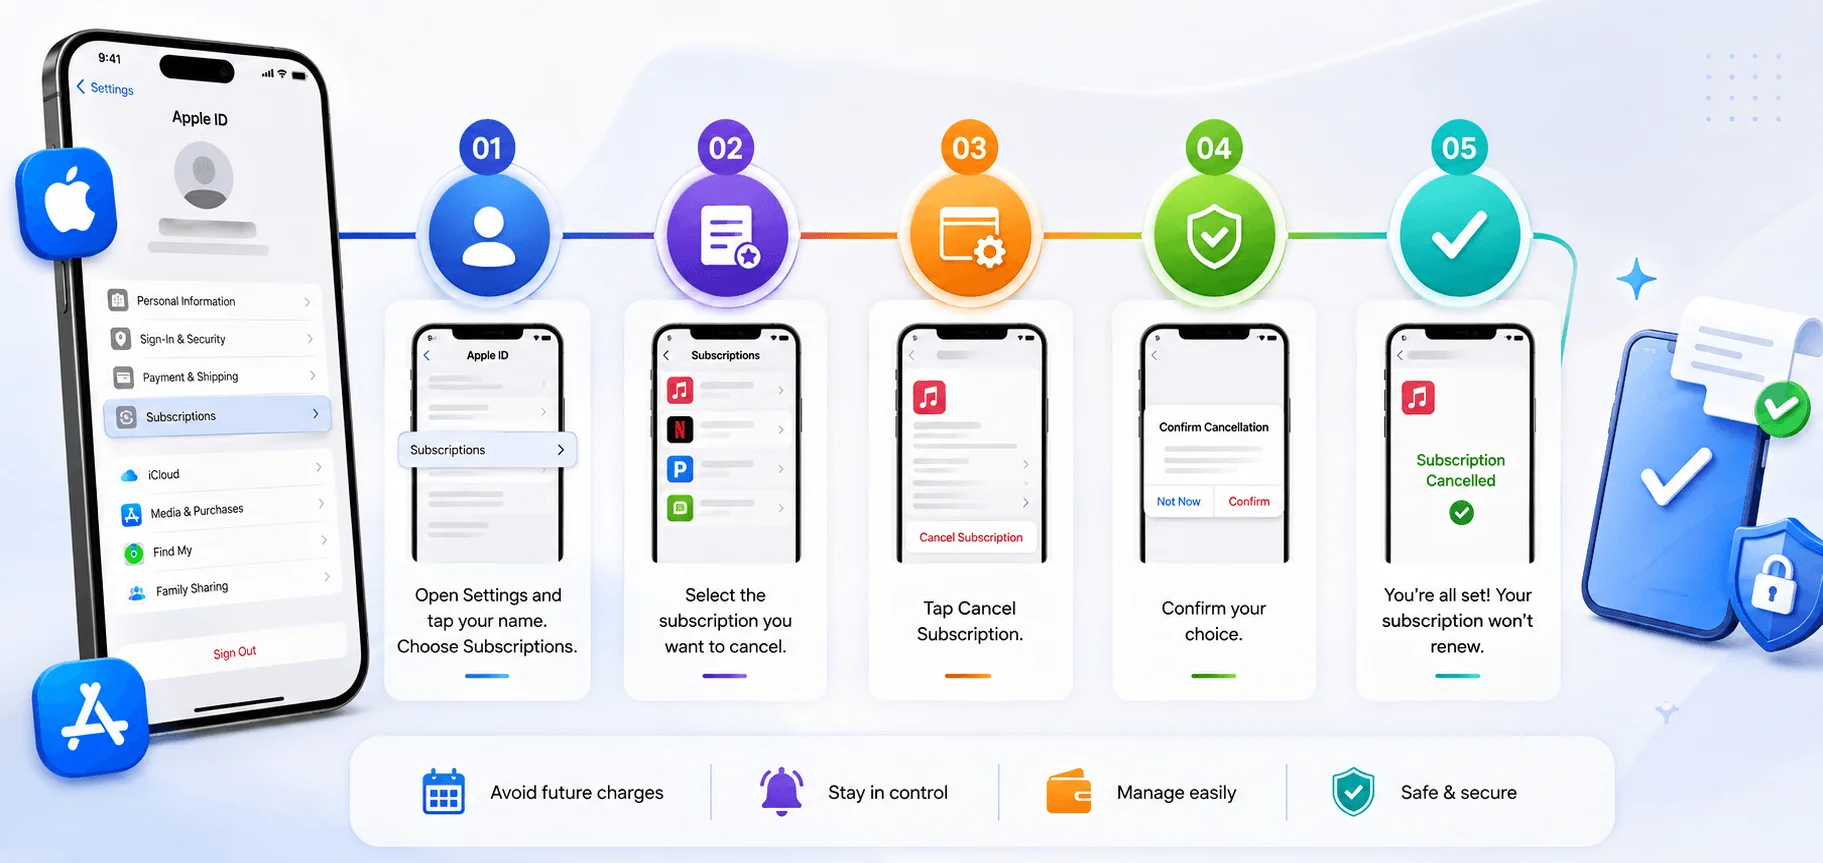
Quick answer: To cancel a subscription on iPhone, open Settings, tap your name at the top, tap Subscriptions, select the subscription, then tap Cancel Subscription and confirm. You'll keep access until the end of your current billing cycle, and no further charges will hit your card. (Steps confirmed current as of iOS 18, 2026.)
Now let me guess why you're actually here.
You signed up for a "free trial" three months ago, told yourself you'd cancel it before the charge hit... and here you are, staring at your bank statement wondering why you're still paying for an app you forgot even existed.
Yeah, I've been there too.
The good news? Learning how to cancel a subscription on iPhone takes less than two minutes once you know exactly where Apple hides the button. In this guide, I'm going to walk you through every single method — Settings app, App Store, even your Mac or a browser — so you never get surprise-charged again.
By the end of this post, you'll know:
The exact steps to cancel subscriptions on iPhone in under 60 seconds
What to do when a subscription doesn't show up (this trips up so many people)
How to request a refund if you got charged anyway
How Family Sharing affects who can cancel what
Country-specific rules that could affect your cancellation
Let's get into it.
If you're the type who likes to stay on top of your apps and accounts, you might also want to check out how Facebook Marketplace works, or what that mysterious green dot on Snapchat actually means.
Why Canceling a Subscription on iPhone Trips People Up
Honestly? It's not that the process is hard. It's that Apple buries it in a menu most people never open.
Between Apple ID subscriptions, App Store purchases, third-party billing, and free trials that convert automatically, there's a lot of room for confusion. And apps know this. Some of them make cancellation deliberately annoying — endless pop-ups, "special offers," retention loops. You've probably run into this yourself.
In fact, subscription fatigue is a real, documented problem — a growing share of smartphone users report actively losing track of at least one recurring charge each year, which is exactly why Apple centralized this whole system into one menu in the first place.
So before we dive into the how-to, here's the one thing you need to understand:
There are basically two types of subscriptions on your iPhone —
Apple-billed subscriptions (set up through the App Store, tied to your Apple ID)
Third-party billed subscriptions (set up directly on a company's website, outside Apple's system)
Only the first type can be canceled from your iPhone settings. The second type? You'll need to go straight to the source. I'll show you how to tell the difference in a second.
Managing all this is really just one part of staying organized across your apps — the same way knowing how Reddit actually works helps you avoid wasting time relearning platforms you already use.
Compare Every Cancellation Method at a Glance
Before you jump into steps, here's a quick side-by-side so you can pick the fastest route for your situation:
Method | Steps Required | Best For | Device Needed |
|---|---|---|---|
Settings App | Settings → Name → Subscriptions → Cancel | Fastest, most direct option | iPhone / iPad |
App Store App | Profile icon → Subscriptions → Cancel | If you're already browsing the App Store | iPhone / iPad |
Mac App Store | Account Settings → Subscriptions → Manage | If you're on your computer | Mac |
Web Browser | Apple ID account page → Subscriptions | No device restrictions, works anywhere | Any browser |
Now let's break each one down properly.
Method 1: Cancel a Subscription Using the Settings App
This is the fastest way, and honestly, the one I use every time.
Here's the step-by-step:
Open the Settings app on your iPhone
Tap your name (your Apple ID banner) at the very top of the screen
Tap Subscriptions
Scroll through your list of active subscriptions
Tap the one you want to cancel
Tap Cancel Subscription, then confirm
That's it. Seriously.
If you don't see a "Cancel Subscription" button, you might need to scroll down a bit further on that screen — Apple tucks it below the plan details sometimes.
And if there's no cancel option at all, or you see a red expiration message? Good news — the subscription is already canceled and won't renew. No further action needed.
A Quick Note on Timing
Here's something a lot of people get wrong: canceling doesn't mean you lose access immediately.
When you cancel, the subscription typically stays active until the end of your current billing cycle — because, well, you already paid for it. You won't get charged again, but you keep your access until that period runs out. So don't panic if the app still works right after you cancel. That's completely normal.
Method 2: Cancel Through the App Store App
Prefer using the App Store directly? Same result, slightly different path.
Open the App Store
Tap your profile icon in the top-right corner
Tap Subscriptions
Select the subscription you want to end
Tap Cancel Subscription and confirm
Both methods pull from the exact same subscription list, so use whichever feels more natural to you. I personally default to Settings because it's one less app to open.
Method 3: Cancel From a Mac or Browser
Don't have your iPhone on hand? No problem — you can cancel from basically anywhere.
On a Mac:
Open the App Store app
Click your name (or Sign In)
Click Account Settings
Scroll to Subscriptions, then click Manage
Click the subscription, then Cancel Subscription
On any web browser:
Go to your Apple ID account page
Sign in with your Apple ID and password
Find Subscriptions under account settings
Select the subscription and click Cancel Subscription
This one's handy if you're on a Windows PC or just don't have your phone nearby.
What to Do If a Subscription Doesn't Show Up
Okay, this is the part that frustrates people the most.
You go to cancel, and... it's just not there. Your subscription is nowhere in the list, but you know you're being charged for it.
Here's why that happens: if a subscription doesn't appear under your Apple ID, it usually means it was set up outside the App Store and is billed directly by the provider. In other words, Apple never touched the transaction — so Apple can't cancel it either.
This is actually really common. Even if you downloaded the app from the App Store, that doesn't automatically mean your subscription runs through Apple's billing system.
Here's a step-by-step checklist if a subscription won't show up on your iPhone:
Check your email receipts — look for confirmation emails from the provider, they usually include a manage or cancel link
Visit the provider's website or app directly and look for billing/account settings
Contact customer support if you can't find a self-serve option
Check your bank or card statement to identify exactly who's charging you, then reach out to them directly
And one more thing worth repeating: deleting the app does not cancel the subscription. Removing an app off your phone only removes the content — the billing keeps going in the background.
Canceling a Free Trial Before You Get Charged
Free trials are basically designed to make you forget about them.
You need to cancel at least 24 hours before the trial ends to avoid getting billed. Not the same day. A full 24 hours before.
The process is exactly the same as canceling a paid subscription — Settings > your name > Subscriptions > select the trial > Cancel Subscription (sometimes it'll say Cancel Free Trial instead).
Pro tip: set a calendar reminder the moment you start a free trial. Relying on memory alone almost never works out.
What Happens If You Already Got Charged?
First step: cancel the subscription immediately, so you don't get charged again next cycle.
Second step: request a refund.
Sign in with your Apple ID
Find the charge in your purchase history
Select Request a Refund
Refunds are not guaranteed. Apple reviews requests case-by-case, and canceling right at the trial deadline (or right after) helps your case. A screenshot showing you canceled on time can strengthen your request too.
If the subscription is third-party (not billed through Apple), go directly to that company for a refund instead.
Regional Cancellation Rules You Should Know
If you're outside the US, cancellation can work slightly differently depending on where you're billed. Apple flags special conditions for a handful of countries — Germany, Israel, South Africa, and Türkiye — where local consumer protection laws affect things like cancellation windows and refund eligibility. If you're in one of these regions, it's worth checking Apple's official subscription terms for your country before assuming the standard US process applies exactly the same way.
Managing Subscriptions With Family Sharing
If you're part of a Family Sharing group, things work a little differently.
If purchase sharing is turned on, subscriptions shared with the group get billed directly to the family organizer's default payment method. So even if you subscribed to something, the organizer might be the one footing the bill.
To manage shared subscriptions:
Open Settings, tap your name
Tap Subscriptions
Tap Manage Family Access
Toggle sharing on or off for eligible subscriptions
Not every subscription is shareable. Individual or student-tier plans usually need to be upgraded to a family plan before they qualify.
Bonus: Canceling Apple One and Bundled Subscriptions
If you're subscribed to Apple One (the bundle combining Apple Music, iCloud+, Apple Arcade, and more), you've got two options:
Cancel the entire bundle — Settings > your name > Subscriptions > Apple One > Cancel Apple One
Cancel just one service — tap Choose Individual Services and turn off only the one you don't want
Canceling the whole bundle removes access to everything included, so use the individual option if you only want to drop one piece.
Frequently Asked Questions
Does canceling a subscription get me an instant refund?
No. Canceling stops future charges, but it doesn't automatically refund what you already paid. You need to separately request a refund through Apple's billing page, and approval isn't guaranteed.
Can I cancel a subscription for a family member in Family Sharing?
Only the person whose Apple ID the subscription is tied to can cancel it directly. As the family organizer, you can stop sharing a subscription via Manage Family Access, but you can't cancel someone else's individually-owned subscription for them.
What if I don't see a Cancel Subscription button at all?
That usually means the subscription is already canceled and set not to renew. Check for a red expiration date on the same screen to confirm.
Will I lose access the moment I cancel?
No. You keep full access until the end of your current billing period, since you've already paid for it.
How do I know if I'm being billed by Apple or by the app developer directly?
If the subscription shows up in Settings > your name > Subscriptions, Apple is the merchant of record. If it doesn't appear there but you're still being charged, it's billed directly by the provider — check your email receipts or bank statement to confirm.
Quick Recap: The TL;DR Version
Settings app → your name → Subscriptions → select subscription → Cancel Subscription
App Store → profile icon → Subscriptions → same steps
Cancellation takes effect at the end of your billing cycle, not instantly
If a subscription's not listed, it's likely billed by the provider directly
Deleting the app doesn't cancel anything
Cancel free trials 24+ hours early to avoid charges
Refunds aren't guaranteed, but you can request one through Apple's billing page
Family Sharing changes who gets billed
Check regional rules if you're in Germany, Israel, South Africa, or Türkiye
Final Thoughts
At the end of the day, canceling a subscription on your iPhone really isn't complicated — it's just not intuitive the first time you go looking for it. Once you know the path (Settings > your name > Subscriptions), you'll never have to think twice about it again.
My honest advice? Do a quick audit of your subscriptions list right now, today. You'd be surprised how many "free trials" quietly became paid plans without you noticing.
Take the two minutes. Your wallet will thank you.
While you're auditing your subscriptions, it's also worth brushing up on other everyday app know-how — like getting the most out of Facebook Marketplace if you're looking to sell off stuff you no longer need to offset those subscription costs.